Building With Toothpicks- Healthy and Fun Construction For Kids

“Don’t play with your food” my grandma used to tell me ….and yet….

Some time ago we had fun with colored pasta, but this time we took playing with food to a different level…a 3D one. So we started building with toothpicks.

Building With Toothpicks- Healthy and Fun Construction For Kids
Fruits with harder consistency like apples, pears ( if not too soft) are perfect. Grapes are also ok, but depending on the construction, they might not be strong enough to hold the weight.
Building With Toothpicks- Healthy and Fun Construction For Kids
We experienced with different fruit shapes and designs….
Building With Toothpicks- Healthy and Fun Construction For Kids
Elena ( 3 years  at the time) was our “quality control”. Testing the endurance ……

Building With Toothpicks- Healthy and Fun Construction For Kids
…. and testing the quality .

Building With Toothpicks- Healthy and Fun Construction For Kids
All I can say is that building with toothpicks kept them busy for a long time!

Building With Toothpicks- Healthy and Fun Construction For Kids

We practiced our fine motoric, built imaginary structures and had lots of fun!
Building With Toothpicks- Healthy and Fun Construction For Kids

The best part of this is that once you’re done building, all the creations are eatable. Yummy, healthy and fun! What more can one desire?
Building With Toothpicks- Healthy and Fun Construction For Kids

We’ll definetly do this again!

Posted in Craft and creativity | Tagged , , , , , , , , , | Comments Off on Building With Toothpicks- Healthy and Fun Construction For Kids

DIY Cardboard Rocket Ship Birthday Countdown

“A cardboard rocket ship”, that’s what my husband proposed when we were brainstorming on what birthday countdown to do for Lukas’ 5th birthday.

He likes rockets, he keeps on drawing them over and over again. So my husband’s idea was a sure bet. But how to make one?

Cardboard Rocket Ship Birthday Countdown
This is what I used for this cardboard rocket ship birthday countdown:

  • a big piece of cardboard for the body ( you can also glue smaller pieces together )
  • 2 smaller pieces of cardboard for he legs
  • 7 paper cups for the windows
  • transparent tape
  • paint, brushes and scissors/utility knife
  • candy in small bags

Cardboard Rocket Ship Birthday CountdownAfter cutting and gluing the cardboard pieces for our cardboard rocket ship, we started the painting.  And we painted … and painted …. and painted … Spreading paint on big surfaces is so much fun! 🙂

Cardboard Rocket Ship Birthday Countdown
Victoria was very excited to help preparing this surprise for her younger brother.

She was in charge of painting the paper cups, selecting the candy, putting it in a small transparent bags and taping it inside the paper cups. This way when Lukas would remove a window of the rocket he’d find inside the hidden candy.

Cardboard Rocket Ship Birthday CountdownOnce all the candy was hidden in the cups, we taped the cups to the body of the rocket and the only thing left was to attach the legs of the cardboard rocket ship.

Cardboard Rocket Ship Birthday Countdown

Using a utility knife (or scissors) I made two cuts in the body to slide the legs in, and that was it. Lukas’ rocket was standing, ready for take-off!

Cardboard Rocket Ship Birthday Countdown

Here are some more ideas for themed birthday countdowns for kids:

Posted in Craft and creativity | Tagged , , , , | Comments Off on DIY Cardboard Rocket Ship Birthday Countdown

Snow Maze: Free Printables For Kids

Snow Maze: Free Printables For Kids
Print this maze and help the little girl find the lost items  that she needs to make her snowman!

This is an excellent trace game for small kids – although my 5 and 6 year olds were also very keen to complete this challenge 🙂

If you liked this, then check out also these other free printables for kids.

[wpdm_file id=7]

Posted in Craft and creativity | Tagged , , , , , , , , , , , , | Comments Off on Snow Maze: Free Printables For Kids

3D Turkey Craft For Kids

I wanted to make an easy turkey craft for kids. Something that looks good and is easy enough to do even for 2 and 3 year olds. Let me know if you like it.

This is the result: a 3D turkey made of cardboard.

Travel with kids - airport game

To make this turkey craft for kids you need:

-a printer to print the free turkey template (see below)
-some coloring tools
-some thin cardboard (cereal and cookies cardboard boxes are perfect for this)
scissors or utility knife

Once you have all the above you can get to work:

Print the template and color it
Glue it on a piece of cardboard
Cut out the turkey’s body and tale and
-Assemble it

You can of course design your own 3D turkey, but you can also subscribe to the CreatifulKids mailing list and download it for free.

Once you’re subscribed, you’ll receive the download link in your confirmation email and you’ll be the first to know when free printables and new posts are available.

Thank you melsbrushes for the feathers I used for this turkey craft!
Posted in Craft and creativity | Tagged , , , , , , , , , , , , | Comments Off on 3D Turkey Craft For Kids

Egg Carton Jingle Bells – DIY Christmas Decorations

If you’re looking for easy to make Christmas decorations, then these egg carton jingle bells might be just the thing for you!

Christmas Decorations - Egg Carton Jingle BellsThis is something we did last year for Christmas, but I did’t have the time to write about it because … life got in the way. But this is such a fun and easy crafts for kids, that I thought it’s worth sharing.

Have a look at the jingle bells we did out of egg carton boxes!

Christmas Decorations - Egg Carton Jingle Bells These are the materials you need to make these Christmas decorations:

Christmas Decorations - Egg Carton Jingle Bells

Make your own Christmas decorations in 4 easy steps:

1-20

Cut a bell looking shape out the egg carton box. If there’s not yet a whole on top of the spike, make one as you will need it later on to attach the bell.

Christmas Decorations - Egg Carton Jingle Bells

1-20

Paint the egg carton bells and let them dry. A word of caution, be prepared for some mess at this phase. If your kids are anything like mine they will end up with paint on their hands and clothes. So either you live with it, or you can use  some protective equipment for the messy artists. You can also use this little trick of ours to avoid a big mess on the table.

Christmas Decorations - Egg Carton Jingle Bells

1-20

Cut the pipe cleaners in pieces – slightly longer than the height of the egg carton bells . Then attach the bells to one end of the cut pipe cleaner and slide the other end into the egg carton bells. If the pieces of pipe cleaner are too short, the kids won’t be able to slide it through the whole and catch it on the other side.

Christmas Decorations - Egg Carton Jingle Bells

That’s it! Your Christmas decorations are ready … unless you want to decorate them like we did below.

1-20

As a last step, you can decorate the Christmas jingle bells with some glitter. I used two shallow containers: one filled with transparent glue, and the other one with red glitter. My kids (age 4 and 5) took turns in dipping the bells first in the glue and then in the glitter. They loved playing with glue and glitter and since they were taking turns, I loved it too as there was almost no mess 🙂

Christmas Decorations - Egg Carton Jingle Bells

So here are our glittery Christmas decorations. 

We couldn’t hang them in the tree, as we had a felt Christmas tree, but we used them as Christmas decorations in the house – hanging on a piece of red ribbon in front of the window – and they looked very nice.

Christmas Decorations - Egg Carton Jingle Bells

If you have some time to spare, some creative kids to grow and some egg carton boxes, then try out these easy to make Christmas decorations!

And another tip: If you’d rather make Christmas lights, then instead of the pipe cleaners and bells, add some Christmas lights. Just like RedTedArt did it here!

For more creative ideas, join the CreatifulKids mailing list.

Christmas Decorations - Egg Carton Jingle Bells

Posted in Craft and creativity | Tagged , , , , , , , , , , | Comments Off on Egg Carton Jingle Bells – DIY Christmas Decorations

Make The Art Projects For Kids A Mess Free Experience!

If it’s one thing that works every time to make my kids happy, is painting!

There’s only one thing that I don’t like about painting with small kids: it’s the cleaning up afterwards.

We don’t really have a special place for our art projects for kids. So when they paint, there is some degree of mess happening.

Make the art projects for kids mess free
Not too long ago, when Elena was 2 and really-REALLY wanted to paint I had this awesome idea – or so I think: To make a portable space, where all our messy art projects for kids could happen and mommy wouldn’t have to clean all the time. That’s when we started to paint inside cardboard boxes.

Make the art projects for kids mess freeTo make this mess free space for the art projects for kids, you’ll need a stanley knife and a wide cardboard box. The cardboard boxes where vegetables and fruits are stored are perfect for this – we get them from our local supermarket.

Make the art projects for kids mess free

I cut out a piece from the side, put all their painting tools inside and we are ready to roll!

Make the art projects for kids mess free

And you know what’s the best thing? If you choose your boxes wisely, they can be great drying racks for all that great kiddie art!

Make the art projects for kids mess free

Was this idea useful? What are your tricks for doing art projects for kids?

Posted in Craft and creativity | Tagged , , , , , , | 2 Comments

A Birthday Countdown With A Bang!

Birthday Countdown Craft for KidsIt’s that time of the year again: Birthday time!
I have 3 kids so it only happens 3 times a year, and yet this time it came as a big surprise.

I totally forgot that Elena was turning 3 in a week! Sure, we were preparing a family party, so I didn’t really forget about her birthday. But I completely forgot about our tradition to make a birthday countdown. I was struck by the terrible feeling that I’m a lousy mom.

There I was making a train birthday countdown for Lukas and a fairy birthday countdown for Victoria and now 7 days before my youngest would turn 3 I had nothing. And that felt bad.

I finally thought of it about 30 minutes before they’d all be home from school. So what was I to do? I had to choose between feeling lousy about myself, or taking action. So action it was! I got creative with what I had around the house: balloons, candy and stickers.

So 30 minutes later this birthday countdown and a happy mom was welcoming the almost 3 year old princess home.

Did she like it? She liked it alright, tough she was very confused about the fact that the balloons had to be popped to get to her surprise. That is so not done in her world! Balloons are there to be played with, and if they break, it’s usually a mini tragedy. Luckily this time the balloon explosion came with a shower of candy and stickers and that made up for the pain of the first broken balloon. The next balloons got popped much smoother.

Here’s how I did Elena’s birthday countdown.

I used 7 big balloons and as usual I had some small candy, stickers and a note as “filling”. The size of the balloons and the candy is important, because if the balloons are too small or the candy is too big, there’s no way to put the “filling” inside.

Birthday Countdown Craft for Kids

I put inside each balloon some candy to be shared between the kids, an activity note and a sticker for Elena.  About the activity note, I was less inspired than the previous time, but luckily for me she can’t read, so I can still adapt last minute 😉

Birthday Countdown Craft for Kids

Then I blew the balloons, wrote numbers on them and hang them on the ceiling using a ribbon and some paper tape. Keeping in mind that my target group consists of little people, I also wrote numbers on the bottom of the balloons. Elena sees her birthday countdown from a different perspective.

Birthday Countdown Craft for Kids

If you’d rather not hang the balloons, you can forget about the ribbon, and you can stick them on the wall or ceiling using a piece of paper tape that you can roll around the finger with the sticky part on the outside.

Birthday Countdown Craft for Kids

Then attach one side of your – homemade – double sided sticky tape on the balloons. That will help you stick the balloon wherever you want it.

That’s it folks! Do you like our latest birthday countdown?
If you want to read more about my play experiences with the kids, join the CreatifulKids mailing list and be the first to know when new articles are available.

Posted in Uncategorized | Tagged , , , , , , | Comments Off on A Birthday Countdown With A Bang!

The Best Way To Explain Technology For Kids

How can one explain technology in a way for small kids to understand?

Hello Ruby Paper Laptop Crafts for Kids

Our technology for kids lessons started with the building of this paper laptop (you’l find there the free computer printable template). If you haven’t seen that yet, go on and have a look and then come back here to read more about how I explained all the technical gadgets to my 4 and 6 year old kids.

Hello Ruby Paper Laptop Crafts for Kids
We started our technology for kids session by looking at a laptop and discovering the “pieces” it is made of: A screen, a keyboard and something under the keyboard that is full of holes. So we went deeper to understand what is under the keyboard. I didn’t want to disassemble the laptop to show the kids what’s inside so we worked with pictures. this and this image work well to show that there are many things under the keyboard. We didn’t get into details. The aim was for them to see that there are MANY things inside.

Then I asked them if they’d like to know more about some of these things and how they all work together to make a computer work.

At that point I had them enthusiastic about learning about computers and that was the start of a long discovery play together. We discussed about hardware and software. I used the comparison to a child and a school to explain the operating system. And from there we went on to learn about the Fan that keeps everything cool, the bossy CPU, the helpful RAM, the Hard Disk that remembers everything, the GPU that controls the screen and the ROM to remember the important stuff.

Hello Ruby Paper Laptop Crafts for Kids

We took it of course step by step.
As a start, I wanted them to understand that you need some hardware in place before you can install the software. From there I went into explaining the Operating System. And to make it easier for them to understand, I made an analogy to a child and the school he goes to.

We discussed also that schools can be in different languages. Just like schools have different languages, computers can have different Operating Systems. And just like kids going to school in different languages, computers with different operating systems will have it harder to talk to each other.

At this point I wanted to get on with the assembly of their computers and have them discover the different components and put them in place. Keeping the analogy to the child and the school, our conversation went a bit like this:

Can a baby go to school?” I asked.
NO” They answered fast.
Why not?” I asked again.
Because a baby cannot talk and it cannot walk,” said Victoria, “and it cannot go to the toilet! And you cannot go to school if you have a diaper!” said Lukas.
So a baby is not ready to go to school. It needs to grow. Right?
Yes!
That’s also the case for our computer. Before we can do anything we need to help it grow
How do we do that?” they asked.
Well…how do babies grow?
They eat” said Victoria.
Right, we give them to eat!” I said “Well, we cannot really give a computer to eat, can we?
NOOOOOOoooooo” they said laughing with me.
But we can give them some components, like these ones we have right here“- and I pointed to the components on our printed page.”That’s how computers grow

While the kids were cutting out the components, I googled for the pictures of these different components and we all watched the pictures and discussed about what they do and made our choices about which one is which. And then they glued it all.

Hello Ruby Paper Laptop Crafts for Kids

Mommy, what is this?” Lukas asked pointing to the fan.
It’s a fan, it helps to keep everything cool inside the computer. Because all these components you put in there to help the computer grow, they get warm when they work all together and if they are not cooled down they break” I explained, while I rubbed my hand very fast against his arm to show him how it gets warm.

“So the fan blows some wind on them to help them cool down.” and I blew some wind on him. “You felt how the wind cooled you down?
Yeah
That’s how a fan works“. I paused and then I continued. “And you know what? The fan makes noise. Do you want to try and hear it?
Yeah!
Put your year against my computer and see if you can hear it

Hello Ruby Paper Laptop Crafts for Kids

And so they did, they listened to both sides of the computer and found the place where the noise was coming from and concluded that that’s where the fan must be. They were delighted!

“What about my phone, do you think it also has a fan?” I asked.
Yes” they said together.
Ok, then listen and try to find it.” I told them.

And then they listened and listened. But smartphones and tablets have no fans so they could not hear anything.

I can’t hear anything!” said Lukas.
Then maybe it has no fan.” I said.
But then it will break!” Lukas said with a genuine worry in his voice.

So I explained him that the tablets and phones are less strong and less smart than the computers. So their components don’t work as hard that’s why they don’t get so hot. So they don’t need a fan to cool the down.

Then we continued talking about the computer components they needed to assemble their computer.

To stay in the same kid & school environment, we compared the Hard Disk with a big cupboard where the computer keeps everything. Like a big wardrobe where a kid would keep everything from clothes to toys to … everything.

And we compared the RAM with a smaller cupboard where things like underclothes and favorite toys would be kept so you can get to them faster and you would not have to search through the whole wardrobe full of pullovers and jackets and toys … and you name it! So the RAM helps the computer find faster the things that you’re using more often. That was the analogy I used, but here’s another great analogy for you.

Then I explained that the CPU (central processing unit) is like the brain. It is the boss and likes to tell everyone what to do, and he is very good at it. Because without it the computer would get confused.

How would you function if your brain would not tell your hand to bring the food to your mouth? Maybe it would get into your nose.” I said.
Ha ha ha” the kids were having a good time. And I knew that they were learning because that’s the best way to learn, when you enjoy yourself.

With the GPU (graphic processing unit), I was short. I just told them that it helps the computer to show us nice movies, pictures and even the games they play on the tablet.

The ROM  was a bit of a hard nut to crack, so while they were busy cutting I told them I need to look online for more information and once I understand I’ll explain it to them. In the end I compared the ROM to a small Hard Drive cupboard with the only difference that the things that are in the ROM cupboard cannot be taken out and changed. You can only look at them. For example as a kid grows, you might take away the small clothes from the Hard Drive cupboard and replace them with bigger clothes. But no matter how much a child grows, his or her name or date of birth will stay the same. So the computer keeps all this information that is not changing in a special cupboard called ROM. So that it can remember it forever.

We discussed about all these while they were cutting and gluing the components for their laptop. And when all the components were in place we concluded that their laptop was not a baby any more and was ready to go to school and start learning.

The computer schools are called Operating Systems. And the funny thing is that the computer doesn’t go to school. It’s the school that comes to the computer. That is why we need to install an operating system on our computer” I explained.
And how do we do that?” Victoria asked.
Well …. we’ll just put a sticker on the computer that shows at what school it went

Then we looked at the stickers on my computer and checked the back of our iPad and saw that these devices went to different schools.

So I asked the kids: “Do you think the tablet can speak to my computer?
No … they have been to different schools so they don’t speak the same language Victoria said.
Probably one speaks Romanian and the other one Dutch” Lukas added
I think you are right” I answered.
“Now you have to decide to which school you want your computer to go to, so which operating system to install
I want to go to the same school as mommy’s computer” said Victoria.
Me too,” Lukas added, “I want that my computer can speak with your computer.

So they both glued the windows operating system on the keyboard and they continued the assembly of their paper computer.

Hello Ruby Paper Laptop Crafts for Kids

After all, if you think about it a bit, technology for kids is not that hard to explain. Or is it?

Posted in Craft and creativity, Parenting | Tagged , , , , , , , , , , | Comments Off on The Best Way To Explain Technology For Kids

25 Color Mixing Activities…And Some More!

“Mama, can we paint?” Is the question I hear least  once a week.

My kids like to paint. We tried painting with all sort of things: from chalk, to shaving cream and egg yolk!

What I’ve noticed, is that if one of the following things happen, then our activity is a success:

1- It involves some degree of mess
2- It’s about learning a new technique
3- It’s an open ended activity and the kids can experiment with color mixing.

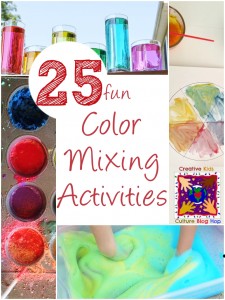
That’s why I liked these 25 Color Mixing Activities that mamashappyhive.com put together. So it was my pleasure to feature it here. I think we can all find some inspiration in this roundup!

25 color mixing activities

For those of you that have a blog, check out the Creative Kids Culture Blog Hop #19!

The Creative Kids Culture Blog Hop is a place where bloggers can share multicultural activities, crafts, recipes, and musings for our creative kids. We can’t wait to see what you share this time!

Created by Frances of Discovering the World through My Son’s Eyes and previously co-hosted by Kristin of Toddling in the Fast Lane and Leanna of All Done Monkey, the blog hop has now found a new home at Multicultural Kid Blogs. And now members can co-host as well, so look for some fresh faces in the coming months!

It’s very easy, and simple to participate!Just follow these simple guidelines:

  • Link up any creative kids culture posts, such as language, culture, books, travel, food, crafts, playdates, activities, heritage, and holidays, etc. Please, link directly to your specific post, and no giveaways, shops, stores, etc.

Creative Kids Culture Blog Hop

  • Please click here to grab the code for the button/picture on your right and put it on your blog or the post you’re linking up. You can also add a text link back to this hop on your blog post.
  • Don’t be a stranger, and share some comment love! Visit the other links, and comment. Everyone loves comments!

The Creative Kids Culture Blog Hop will go live on the 3rd Sunday of the month. It will run for three weeks. The following blog hop we will feature a previous link up post, and if you’re featured, don’t forget to grab the button.

"Creative
<div align="center"><a href="http://alldonemonkey.com/category/parenting/raising-global-citizens/creative-kids-culture-blog-hop/" title="Creative Kids Culture Blog Hop" target="_blank"><img src="http://1.bp.blogspot.com/-ajb4TxSmYlI/UTDtNW_oCLI/AAAAAAAAGOY/g-TYeax5flc/s1600/featured+culture+button+2-email+small+size.jpg" alt="Creative Kids Culture Blog Hop" /></a></div>

I can’t wait to see what you’ve been up to!
Note: By sharing your link up on this blog hop you are giving the permission to feature your blog post with pictures, and to pin your link up in Creative Kids Culture Feature board on Pinterest.


Posted in Craft and creativity | Tagged , , , , , , | 2 Comments

A fun crafts activity to explain computers to tots

Mommy, the computer is out of INTERNET, we need to CHARGE it! my son replied when I asked him why he was fiddling with the plug and the power cord.

My 4 year old boy had a point. The computer was out of battery. So while helping him with the plug, I thought in loud voice: “Ah … the battery is empty. The internet is fine” and I wanted to return to whatever I was doing at the moment. But then a little voice asked “Mommy, what is internet?” And I froze.

How do you explain a 4 year old what the Internet is? 

And how do you explain how a computer – or a tablet or smartphone – works?
That’s how I started looking for ways to explain technology to my little ones. So I was very happy when I saw the invitation to test one of the games from the Hello Ruby book where the kids could make their own computer and learn how it works. That was exactly what I was looking for!

Hello Ruby Paper Computer Crafts for Kids

So I got hold of it and we started to play and learn about technology !
The goal was to assemble a computer, install an operating system, select the software and design a webpage, application or game. In the meantime we all learned about the hard and soft components needed to build a computer.

It was one of the best and meaningful crafts session we had in a long time!

Hello Ruby Paper Laptop Crafts for Kids

Do you want to know what we did and maybe do the same paper computer with your kid(s)? 

Then this is what you’ll need to make your own Hello Ruby laptop:
– print the PDF with the computer and accessories
– print the play instructions (it will help you run the session)
– some pieces of cardboard (about the size of an A5)
– glue and transparent tape
– colored pencils
– and a real computer (so you can go online and ask the mighty Internet all the questions you don’t know the answer to yourself)

Later on we also used:
– some empty pieces of paper (because my kids wanted to create more computer stuff)
– 2 paper clips and a piece of thread (for our mouse) – although you can do without these if you decide to make a “wireless one” 🙂

So armed with the materials and having a curious 6 year old and an eager 4 year old by my side, we got started.

STAGE 1: Preparation

Lukas decided to first cut everything out before starting, while Victoria wanted to just cut out the pieces when she needed them. Each kid has it’s way of doing things. That’s cool.

As support for our paper computers we used cardboard. I took pieces form a cardboard box so they would have a fold in the middle of each piece, this way our creations look even more like laptops.

Hello Ruby Paper Laptop Crafts for Kids

While the kids were cutting and gluing, we discussed about what each component is and what it is used for. We went online to see how the components look and we made parallels to the things they are familiar with. And in the end, I think we more or less understood everything. It was as much a lesson for them as it was for me. If you want to read more details on the explanation I gave about each component – and the associations I made for their little minds to better understand each point – have a look over here.

STAGE 2: Assembly

After the discovery phase, we started to assemble the paper computer.

Hello Ruby Paper Laptop Crafts for Kids

We used glue for most parts except the website and the keyboard. For those we used transparent tape because the kids decided they want to be able to access the inside of the computer and its files.

Hello Ruby Paper Laptop Crafts for Kids

This way if a component would get broken or a file would get corrupt they could reach it and fix it. Good thinking – right?

Hello Ruby Paper Laptop Crafts for Kids

They of course added a camera and a start button also using the stickers, and the computer files and operating system so that it could start functioning.

STAGE 3: Development

After examining his laptop, Lukas pointed out that it needs a battery – because he now knows that battery and internet are 2 vital parts needed in order to watch his favorite YouTube cartoons 😉 But he was not in the mood to make one. He just wanted to make a point that it’s missing from his paper computer.

Victoria decided that she wanted to have access to more webpages. That’s because she wanted to be able to look at movies, at pictures and to read. So she started designing them.

Hello Ruby Paper Laptop Crafts for Kids

And then she told me that she’d like to have a mouse. So after a bit of discussion about how it should look, I helped her design one. Here’s my work of art !

Hello Ruby Paper Laptop Crafts for Kids

I was so proud of my idea to connect the cord using paper clips! I thought it’s super cool … That’s until Lukas asked me: “Why did you make that?” – pointing to the cable of the mouse – “Granma’s mouse has no cable“. Ah … a wireless mouse. I forgot about that!

Well, some of them are smarter than others,” I said, “you can use it with or without the cable, you choose.” And that seemed to be a good enough explanation for him. Luckily for me because I had no clue how to approach the wireless technology with my 4 year old. So I was happy to leave this for another time 🙂

STAGE 4: Testing

Once everything was properly made – the components in their place, the proper files and operating system installed – the testing could start. How did it go?  …. I’ll let you judge from the pictures 🙂

Hello Ruby Paper Laptop Crafts for Kids

Notice the comfortable keyboard and the fast browsing speed?
Hello Ruby Paper Laptop Crafts for Kids

In conclusion, I’m now happy to present you the coolest, sleekest newest gadget in the house: The revolutionary HelloRuby laptop! 

Hello Ruby Paper Laptop Crafts for Kids

What’s next?

This is a prototype, and I invite you to test it also. If you do, keep a note of the questions the kids ask, what interests them and what are the speed bumps. We’d love to see pictures of the finished computers! You can submit your pictures and notes here.

If you want to read more about my play experiences with the kids, join the CreatifulKids mailing list and be the first to know when new articles are available.

Posted in Craft and creativity | Tagged , , , , , , , , , , , , , , , , , , | Comments Off on A fun crafts activity to explain computers to tots